How to Add Live Chat to WordPress (No Coding Needed)
Add Hodhod live chat to WordPress or WooCommerce in minutes with the free Hodhod plugin, or with WPCode or your theme, plus fixes for common issues.
In this article
If your site runs on WordPress or WooCommerce, installing Hodhod live chat takes a couple of minutes. This guide covers three methods: the recommended one uses the free Hodhod Live Chat plugin; the other two paste the code with the WPCode plugin or into your theme.
Before you start: get the code from the panel
First create a website inbox in the Hodhod panel. The step-by-step (with screenshots) is in the website installation guide. You'll need the installation code, which is shown when the inbox is created. You can copy it again at any time: open Settings → Inboxes → your website inbox and, on the "Settings" tab, switch the widget preview from "Preview" to "Script".
Method 1 (recommended): the Hodhod Live Chat plugin
The official Hodhod plugin adds the widget to every page of your site, lets you choose how it looks, and loads it without slowing your pages down.
- Download the plugin: hodhod-live-chat-1.0.1.zip.
- In your WordPress dashboard, go to Plugins → Add Plugin and click "Upload Plugin".
- Choose the zip file you downloaded, click "Install Now", then "Activate Plugin".
- Go to Settings → Hodhod Live Chat.
- Paste the whole code from the Hodhod panel into "Website code or token" and click "Save Changes".
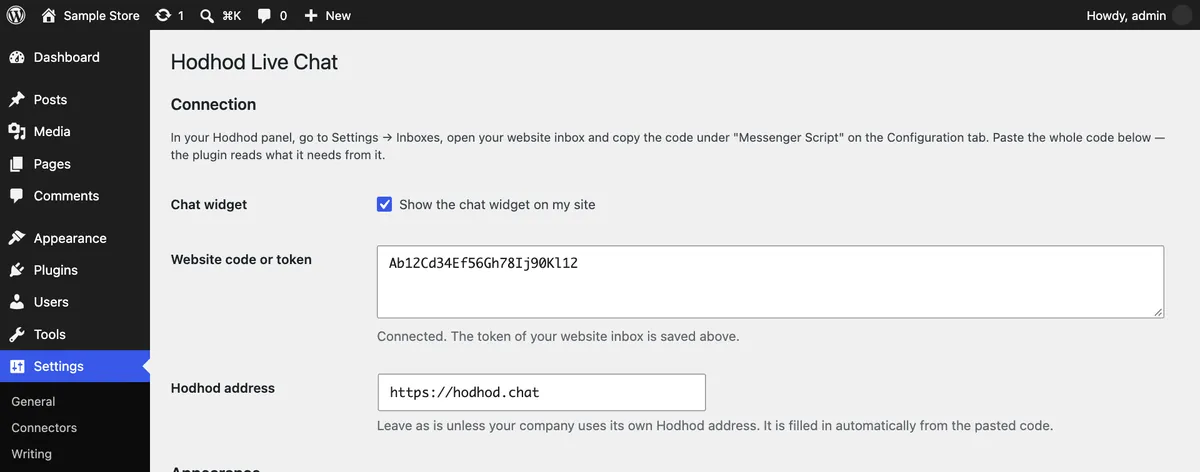
That's it: the plugin reads the website token from the code, and the chat button appears on every page, including WooCommerce product, cart and checkout pages. On the same page you can also set:
- Position: bottom right or bottom left.
- Chat button: a round button, or a button with your own text.
- Theme: follow the visitor's device, always light or always dark.
- Language: by default the widget follows your site's language (with right-to-left layout for Persian and Arabic); you can also use the visitor's browser language or pick one.
- Page speed: "Load the chat after the page" (on by default) loads the widget on the visitor's first scroll, tap or key press, or a few seconds after the page has loaded, so it doesn't affect your page speed.
- Signed-in users: if your customers log in (for example to a WooCommerce account), turn on "Send the name and email of signed-in users to Hodhod" and paste the secret key from the "Identity Validation" section on the "Configuration" tab of the same inbox. Your team then sees who they're talking to, and customers keep the same conversation across devices. The key stays on your server; it is never sent to the browser.
Method 2: the WPCode plugin
If you already use WPCode (full name "WPCode – Insert Headers and Footers + Custom Code Snippets") to add code to your site, you can paste the Hodhod code there:
- In your WordPress dashboard, go to Plugins → Add Plugin.
- Search for "WPCode", then install and activate "WPCode – Insert Headers and Footers".
- In the sidebar, go to Code Snippets → Header & Footer.
- Paste the Hodhod code into the Footer box.
- Click "Save Changes".
The code now loads on every page of your site, and it survives theme updates and theme switches.
Method 3: edit your theme file
If you'd rather not install a plugin, you can paste the code straight into your theme's footer file:
- In the dashboard, go to Appearance → Theme File Editor.
- Open
footer.phpfrom the file list. - Paste the Hodhod code just before
</body>and click "Update File".
Two important notes: if you edit your main theme (not a child theme), a theme update will erase this change — so either create a child theme or use method 1. Newer block themes (such as Twenty Twenty-Four) have no
footer.php, so only methods 1 and 2 work for them.
After installing: test it
Open your site in a private browser window and scroll a little: the chat button appears at the bottom of the page. Send a test message and check that it arrives under "Conversations" in the Hodhod panel.
Fixing common issues
The widget doesn't appear
Most of the time it's the cache. Clear the cache of plugins such as WP Rocket, LiteSpeed Cache or W3 Total Cache — and your CDN's cache, if you use one — then try again. With the Hodhod plugin, also check that "Show the chat widget on my site" is ticked and the website code is saved.
The widget appears late
With the Hodhod plugin this is intentional: the chat waits for the visitor's first interaction, or a few seconds, so your content loads first. To show it as soon as the page loads, untick "Load the chat after the page". With methods 2 and 3, some speed-optimization plugins delay scripts until the first interaction (for example, a "Delay JavaScript execution" option); exclude sdk.js from that list if you want the widget visible right away.
My site is multilingual
With the Hodhod plugin, keep the language on "Same as this site": with plugins like WPML or Polylang, the widget follows the language of each page. With methods 2 and 3, add window.chatwootSettings with that page's locale before the main code — details are in the installation guide.
Frequently asked questions
Does it work with WooCommerce?
Yes. WooCommerce runs on WordPress, and the chat loads on every page, including cart and checkout — the best places to answer pre-purchase questions. With identity validation on, signed-in customers are recognized in the Hodhod panel.
Does the Hodhod plugin slow down my site?
No. With "Load the chat after the page" on (the default), the widget loads only after your page, on the visitor's first interaction or a few seconds later.
Will the widget disappear if I change my theme?
Not with methods 1 and 2, because the settings and code are stored separately from the theme. With method 3, you'll need to add the code to the new theme's file as well.